SSO (Single Sign-On) allows users to access multiple applications/cloud services with a single set of credentials, streamlining authentication and enhancing security. When applied to EKS clusters, SSO centralizes access control, reducing the risks associated with static credentials. Integrating SSO with EKS not only strengthens security but also enhances operational efficiency.
So What’s the Problem 🤔?
However, accessing EKS clusters via kubectl through SSO user entails additional complexity than using the traditional method (IAM User). In this blog, we'll explore:
How to leverage SSO users for EKS cluster access via Kubectl?
The duration of session validity?
Steps required to refresh the session when it expires?
Prerequisites
Make sure you are logged into the SSO account.
You should have access to the AWS account via SSO User.
AWS CLI & Kubectl are installed on your machine.
1. Set Up AWS CLI
Use the following commands to install AWS CLI on your machine.
curl "https://awscli.amazonaws.com/awscli-exe-linux-x86_64.zip" -o "awscliv2.zip"
unzip awscliv2.zip
sudo ./aws/install
Check the AWS CLI version
aws --version
2. Set Up Kubectl
Use the following command to install kubectl on your machine.
sudo apt-get update
sudo apt-get install -y apt-transport-https ca-certificates curl
sudo curl -fsSLo /usr/share/keyrings/kubernetes-archive-keyring.gpg https://packages.cloud.google.com/apt/doc/apt-key.gpg
echo "deb [signed-by=/usr/share/keyrings/kubernetes-archive-keyring.gpg] https://apt.kubernetes.io/ kubernetes-xenial main" | sudo tee /etc/apt/sources.list.d/kubernetes.list
sudo apt-get update
sudo apt-get install -y kubectl
Check the kubectl version.
kubectl version
Create .kube directory, used to store kubeconfig file of the cluster.
mkdir -p ~/.kube
Once you’ve met all the prerequisites, It’s time to set up an SSO profile, and access EKS clusters …!
Setting up SSO Profile via AWS CLI
Create an SSO profile using the following AWS command.
aws configure sso
It will prompt for the following inputs:
SSO session name (Recommended): imtiaz-sso
SSO start URL [None]: <sso-url>
SSO region [None]: us-east-1
SSO registration scopes: [sso:account:access]:
SSO Session name: Put the name whatever you want, I used imtiaz-sso
SSO Start URL: Put SSO URL.
SSO region: us-east-1
SSO registration scopes: Press enter to go with the default SSO registration scopes
Note: Remember the session name used above, as this will be reused.
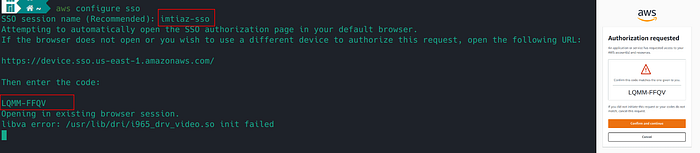
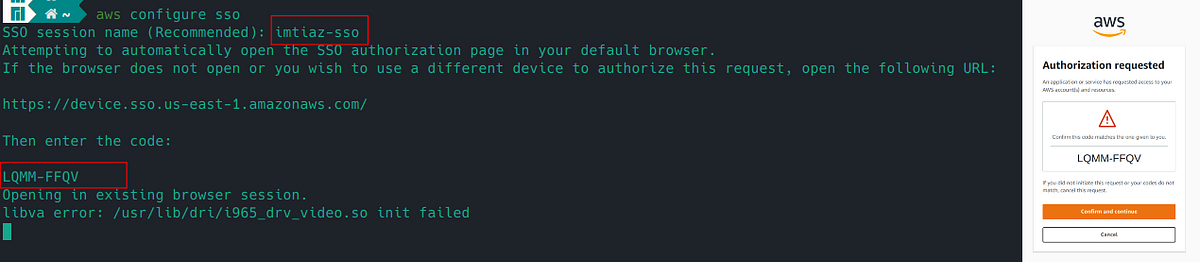
Once you press enter, it will show the following output on your terminal [right image], and also redirect you to the browser [left image].
You should see the same code on the terminal & browser.
Confirm & Continue.
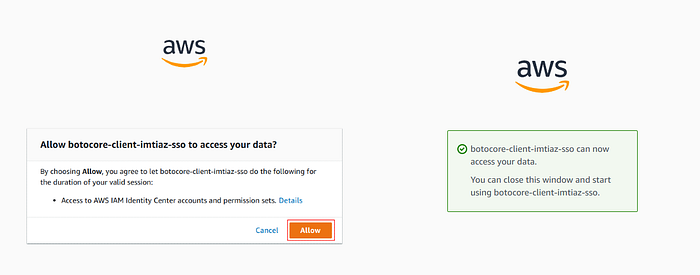
It will show a pop-up in the browser, as shown below. Click on Allow[right image]. You’ll see the success message[left image]!
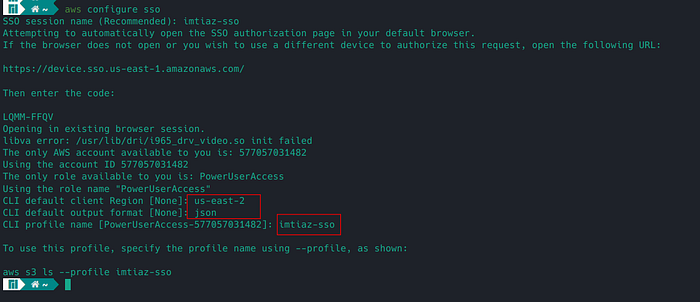
Once this is done, get back to the terminal and complete the required configurations:
Use your CLI default region, in my case it is us-east-2
Use json as the default output format
Give the CLI profile name, whatever you want, but as a best practice give it the same as the SSO Session name.
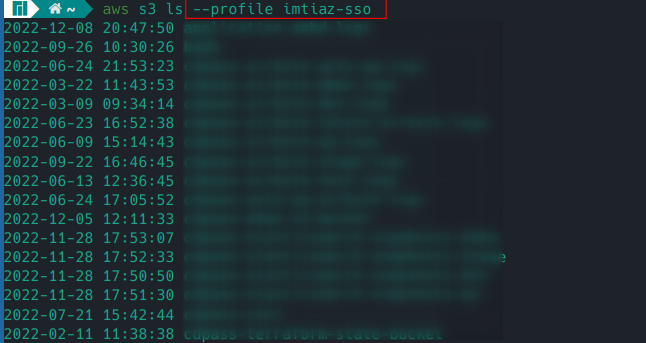
Confirm that you can access buckets using the profile name.
Yay.. you’re all done from the setup side.
Build an ARN version of SSO USER
Run the following command to build an ARN
Make sure to use the --profile with the name you’ve set before.
ssorole=$(aws sts get-caller-identity --query Arn --output text --profile imtiaz-sso | cut -d/ -f2)
account=$(aws sts get-caller-identity --query Account --output text --profile  imtiaz-sso)
echo "arn:aws:iam::$account:role/$ssorole"
This will output an ARN against your SSO user, something like this, as shown below
arn:aws:iam::<account-id>/role/AWSReservedSSO_PowerUserAccess_3dde4585cb3da811
NOTE: Provide the ARN to the Cluster Administrator to whitelist this SSO user in the EKS cluster.
Accessing EKS clusters via SSO User
Once your cluster administrator has whitelisted your SSO profile, you’re now ready to grab the EKS cluster’s kubeconfig file.
aws eks update-kubeconfig --kubeconfig ~/.kube/<cluster-name> --profile <imtiaz-sso> --region <region> --name <cluster-name>
Make sure to use --profile with the name you’ve set before.
You can use any path & file name --kubeconfig ~/.kube/<kubeconfig-name> to download the kubeconfig file.
After a successful run, It should create a config file inside ~/.kube directory
Activate the EKS configuration file and get the resources.
export KUBECONFIG=~/.kube/<kubeconfig-name>
Run the following command to confirm, if you have access to the EKS cluster.
kubectl get pods
NOTE: SSO credentials are short-lived and are valid for 12 hours at max.
Since Sign-On (SSO) users' credentials are short-lived, hence we need to renew access to the EKS cluster by following the outlined process.
Renew Access to EKS Cluster
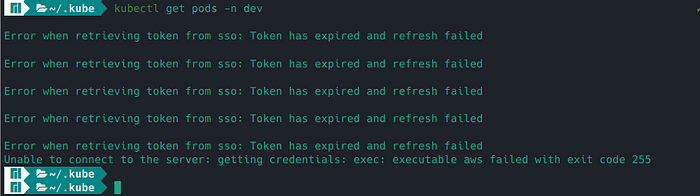
When the token expires, you’ll see the following error message on either the terminal or on Lens ID.
To renew access to the EKS cluster, follow the steps mentioned at [Setting up SSO Profile via AWS CLI].
Use the same Session & Profile name that you’ve used while setting it up for the first time. Otherwise, you’ll lose the access to the EKS cluster.
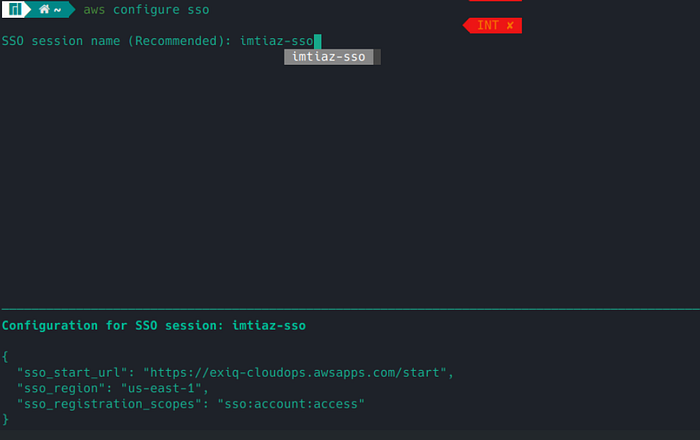
For the 2nd time, when you run the following command, it will show the session information at the end of the terminal, as shown below.
Press enter, and complete the remaining steps described above.
That’s all! 👏 🎉 I’d love to hear your feedback on this solution. Feel free to ask any questions or share your suggestions about the post.
Get Muhammad Imtiaz’s stories in your inbox
Join Medium for free to get updates from this writer.SubscribeHappy learning! 😊
References