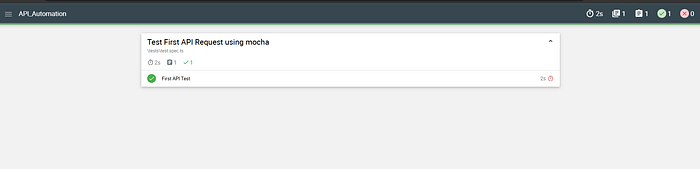
After running the test, you’ll see a detailed report generated by Mochawesome.


Feb 27, 2025
7 min read
I started my career as a UI Automation Engineer, and after gaining two years of experience, I have come to a crucial realization: for the majority of projects, UI Automation does not make sense when project is in its initial stage.
There are several reasons behind this conclusion, which I will discuss in this blog. Instead of UI Automation, I strongly believe that API Automation should be prioritized, as it offers greater stability, faster execution, and better maintainability.
APIs are the backbone of any application — Ensuring they function correctly validates the entire application’s functionality.
Faster execution time — A well-structured API automation suite executes significantly faster than UI automation. From my own experience, a UI automated flow that took 15 minutes was reduced to half that time when automated via API.
Lower maintenance cost — UI automation requires constant updates due to changes in selectors. Instead of validating functionality, much time is spent updating locators and maintaining the test suite.
More robust development — API automation forces better coding practices by ensuring back-end validations. Many applications rely solely on frontend checks, leading to quality issues in the long run.
API Automation can create value much faster compared to UI Automation. The number one reason is that it is quicker to implement and does not require handling UI limitations. Additionally:
Requires less setup, as it eliminates browser dependencies.
Ideal for projects in the initial stages, where the UI is not stable. Investing in UI automation too early might not be beneficial.
If resources are limited, prioritizing API automation allows teams to focus on manual UI validation, improving overall productivity. And not worrying about Core functionality of Application.
That said, UI automation is still crucial, but API automation is often overlooked in the early stages of a project. Delaying API tests can result in core functionality going untested, leading to larger problems down the road.
Although tools like Postman and Cypress exist, they have limitations in terms of:
Maintainability & scalability — Handling large test suites and complex workflows can become challenging.
Integration with CI/CD — Running API tests within an existing automation pipeline can be difficult.
Development efficiency — Many teams already have UI or performance automation. Using external tools adds extra maintenance overhead.
A custom framework removes restrictions imposed by external tools and allows optimization based on project needs. The sample implementation shared in this blog is not about reinventing everything from scratch but rather combining all essential components required for implementing API automation effectively.
To address these challenges, I built a custom API automation framework that is scalable, robust, and easy to integrate with CI/CD pipelines. Below is a step-by-step guide to setting it up.
Before we start, ensure you have the following installed:
Node.js
NPM
TypeScript (JavaScript can also be used, but this guide uses TypeScript)
VS Code (or any code editor of your choice)
Run the following commands to initialize the project and install the required dependencies:
npm init -y
npm install --save axios mocha mochawesome assert zod typescript
npm install --save-dev @types/node @types/mocha
Mocha
Mocha is a simple and easy-to-use testing framework that helps write tests in a readable manner. It offers many features, including parallel execution and the ability to skip tests.
Mochawesome
Used for reporting, Mochawesome generates reports once tests are executed successfully. The report includes both JSON and HTML formats, making it easy to share with the team.
Assert
This library is used to add assertions to API tests, ensuring expected behavior.
Zod
Zod helps in validating schemas, which is crucial in API automation to ensure data integrity and consistency.
A well-structured API automation framework improves maintainability and scalability. The recommended directory structure is as follows:
📂 API_Automation_Project
 ├── 📂 main (Contains core logic and utilities)
 │   ├── 📂 api (Holds API request functions, endpoints, and payloads)
 │   ├── 📂 config (Stores environment configurations, credentials, etc.)
 │   ├── 📂 workflows (For auxiliary functions, e.g., database connections)
 │   ├── 📂 utils (Contains reusable functions like API calls and assertions)
 ├── 📂 tests (Holds test execution files)
The structure of the codebase is crucial for readability and maintainability. Code should be written in a format that is easy to understand, ensuring smooth onboarding for new team members.
Once you have completed your directory and code structure. Next up you require a mechanism to execute your test. To execute tests written in mocha you will have to use following command
npx mocha <Path_of_test_to_be_executed> — timeout=30000 — reporter mochawesome
The potential issue with running the tests directly from mocha like this can be when you will have a large number of tests and you want to execute some specific tests or in any order. Maybe you also want to integrate some reporting once tests are completed like email notifications. In those cases your will be requiring to write some mocha configuration file.
const { execSync } = require('child_process');
const path = require('path');
let filePath = "<PATH_OF_TESTS_YOU_WANT_TO_EXECUTE>";
function runTests() {
  const timeout = 20000;
  const reporter = 'mochawesome';
  const outputDirectory = './reports';

  const command = `npx mocha --require ts-node/register --reporter ${reporter} --reporter-options reportDir=${outputDirectory} --timeout=${timeout} ${filePath}`;
  try {
    execSync(command, { stdio: 'inherit' });
  } catch (error) {
    process.exitCode = 1;
  }
}
if (require.main === module) {
  runTests();
}
Execute the test using:
ts-node mocha.conf.ts
Writing Your First API Test
Let’s write a simple Mocha test case using Axios.
const axios = require("axios");
describe("API Automation - First Test", async () => {
    it("Validates a GET request", async () => {
        const res = await axios.get("https://www.youtube.com/");
        console.log(res.data);
    });
});
After running the test, you’ll see a detailed report generated by Mochawesome.
In the example above, we made a GET request directly using Axios. However, using Axios or making API calls directly within the main test increases the lines of code unnecessarily, which can negatively impact readability in the long run.
To avoid such issues, it is better to create reusable utility functions in a separate utils file. This approach improves code maintainability, readability, and reusability while keeping the test cases clean and focused on validation rather than API request execution.
export async function getRequest(endpoint,headers) {
let apiResponseObject = {}
    var config = {
      method: 'get',
      url: endpoint,
      headers: headers
    };
    await axios(config)
      .then(function (response) {
        Object.assign(apiResponseObject, { Status: response.status })
        Object.assign(apiResponseObject, { Data: response.data })
      })
      .catch(function (error) {
        Object.assign(apiResponseObject, { Status: error.response.status })
        Object.assign(apiResponseObject, { Data: error.response.data })
      });
    return apiResponseObject
  }
In my sample implementation, you will find all these details covered. So, don’t worry — if you want to learn more about the project structure, it’s already included!
Okay so we are done with structure, writing our tests, running tests. Now lets move towards the most important part that is the validation
For an effective API automation suite, three key levels of assertions should be followed:
Status Codes — Ensure correct HTTP response codes are returned.
Response Validation — Validate the content of the response.
Schema Tests — Detect changes in API responses and validate data types.
The recommended order is:
Status Code Validation — If the status code fails, there is no need to check the response and schema.
Response Validation — Validate the actual response content.
Schema Validation — Ensure no unexpected changes occur in the response structure.
Microservices Testing — If your application follows a microservices architecture, structure API tests at the service level.
Prioritize Critical Test Cases — Automate test cases that add the most value and impact business logic the most.
Early CI/CD Integration — Do not wait to increase test coverage before integrating tests into CI/CD. Early integration helps identify issues sooner.
By following this guide, you now have a structured, scalable, and maintainable API automation framework. This approach not only improves testing efficiency but also enhances the overall software quality by catching issues early in the development cycle. I have attached a sample implementation repository as well so that you don’t have to do all the steps to get yourself going. Just clone the repository and just run npm i and all dependencies that you require will be downloaded. And you will be all set to write your first test
🚀 Happy Testing! If you found this helpful, feel free to share it with your QA and development teams!
Boilerplate: https://github.com/wisamulhaq/API_Automation