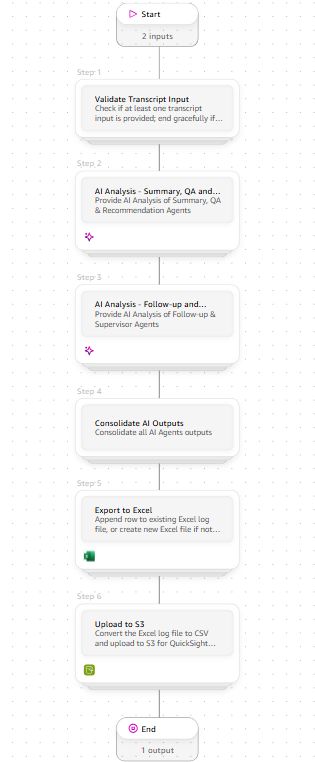
Automation Workflow Overview
A customer call doesn’t really end when the call ends. For the agent, the real work often starts right after: writing a summary, updating the CRM, logging a support ticket, drafting a follow-up message, and flagging anything that needs a supervisor’s attention. This is repetitive, time-consuming, and inconsistent from agent to agent. Because of the sheer volume of calls, most contact centers can only afford to run quality checks on a sample of calls, not every single one.
This solution was built using Amazon Quick to address exactly this gap. An AI-powered workspace that takes a finished call, whether it’s a text transcript or an actual voice recording, and automatically produces everything an agent would otherwise have to write by hand. The result: faster turnaround, consistent documentation, and quality evaluation on every call, not just a sample.
This post walks through how the solution works and how the pieces fit together.
The solution is built on Amazon Quick, using Quick Automate to orchestrate the AI workflow, QuickSight dashboards and datasets for reporting, and spaces and action connectors for grounding and data connectivity.
The processing flow follows five stages:
Input: a call transcript file or a voice recording is submitted.
AI Processing: the input is routed through five specialized AI agents.
Consolidation: each agent's output is merged into a single result.
Export: the consolidated result is written to an Excel log and uploaded to S3.
Reporting: a dataset built from that S3 file powers a live dashboard and an on-demand digest.
Automation Workflow Overview
The design intentionally keeps each AI agent focused on a single responsibility: summarization, quality evaluation, case classification, follow-up drafting, and supervisor review rather than one large agent trying to do everything at once. This keeps each agent's instructions simpler, makes outputs easier to evaluate and improve independently, and mirrors how a real after-call review process is naturally divided into distinct tasks.
The automation accepts two types of input: a call transcript file (.txt or.pdf) or a voice recording processed through Amazon Transcribe Call Analytics, whose output file (.json) can be uploaded directly instead. A validation step checks that at least one input is provided before processing continues and ends the automation cleanly if neither is present.
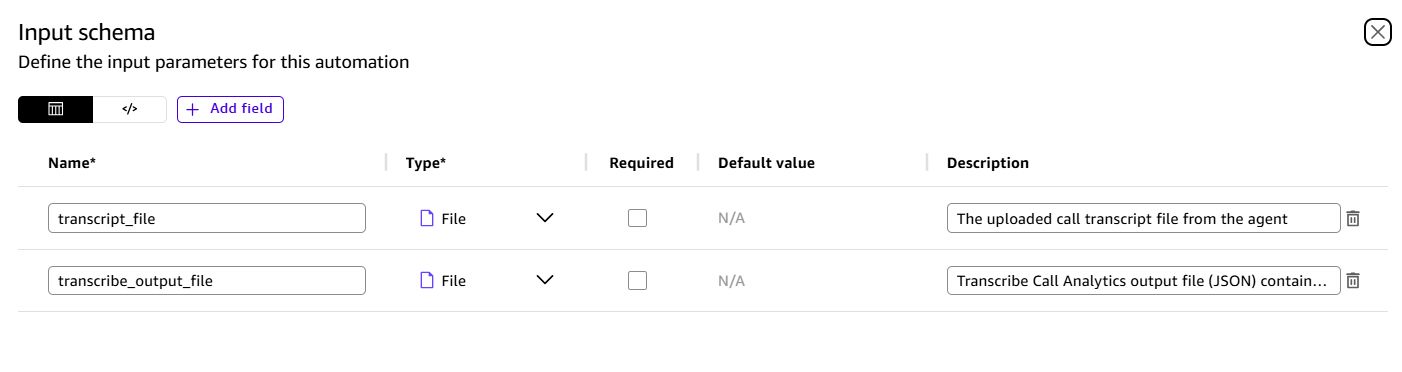
Input Schema: Transcript File and Voice Recording
The automation runs a call through five specialized AI agents, each responsible for one part of the after-call workflow:
Summary: generates the call summary and disposition.
QA: scores the call on Compliance, Empathy, and Resolution Quality and computes an overall score.
Case: recommends a priority and category for the case.
Follow-up: drafts a customer-facing email or message.
Supervisor: flags risks and coaching opportunities for review.
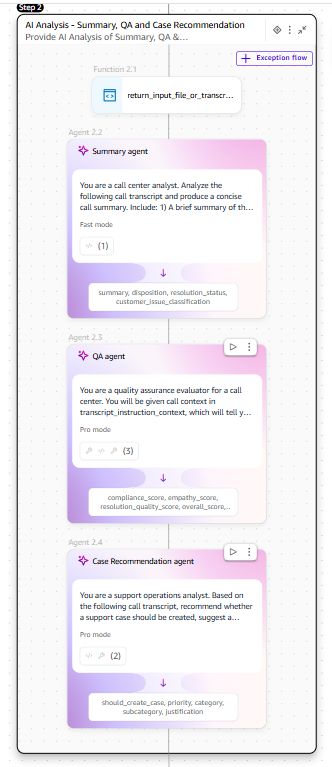
AI Processing: Summary, QA, and Case Recommendation Agents
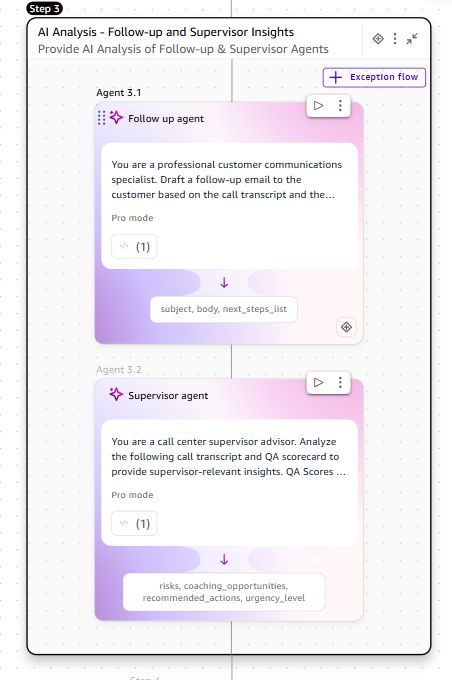
AI Processing: Follow-up and Supervisor Agents
Each agent works from the same call data but focuses on a single, well-defined task, keeping instructions simpler and outputs easier to evaluate independently.
To keep Compliance scoring consistent, a compliance criteria document covering things like identity verification, required disclosures, and escalation handling is uploaded to Amazon Quick as a file. The QA agent references this file from Spaces directly when scoring Compliance, so every call is checked against the same defined standard rather than general AI judgment.
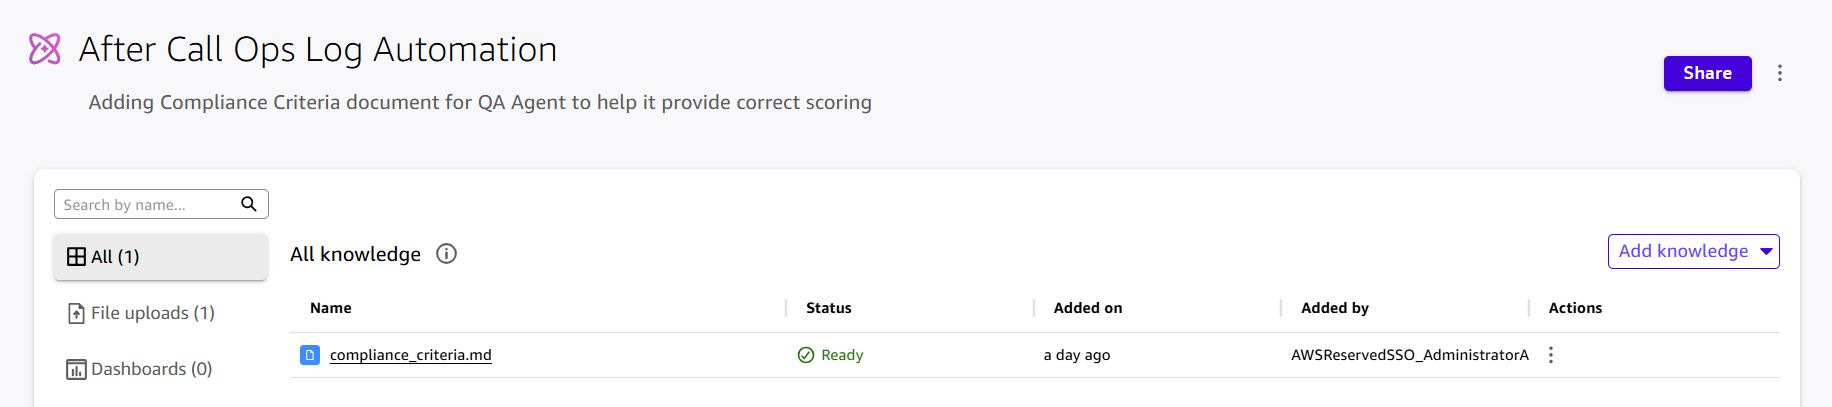
Compliance Criteria Uploaded to Amazon Quick Spaces
The call recording is uploaded to an Amazon S3 bucket.
An Amazon Transcribe Call Analytics job processes the audio and writes its output as a JSON file back to Amazon S3.
This JSON file can be downloaded directly from Amazon S3 and uploaded into the automation in place of a plain transcript.
Beyond the transcript text, the JSON includes sentiment, tone shifts, interruptions, and talk time per speaker.
The QA agent uses this data as supporting evidence when scoring Empathy, supplementing, not replacing, its own reading of the transcript.
The automation validates that an input was provided before proceeding.
The input is routed through the five AI agents.
Each agent's output is merged into a single consolidated result.
This result is appended as a new row to a shared Excel log, which accumulates across every processed call.
The same data is also uploaded to Amazon S3 in CSV format, which feeds the reporting layer described next.
Before creating the connector, the specific Amazon S3 bucket needs to be granted access at the account level: under Manage Quick → Manage resources → AWS resources, enable Amazon S3 and select the specific bucket(s) Amazon Quick should be able to access.
Separately, an IAM role needs to be created with a trust policy that allows Amazon Quick to assume it:
{
  "Version": "2012-10-17",
  "Statement": [
    {
      "Effect": "Allow",
      "Principal": { "Service": "quicksight.amazonaws.com" },
      "Action": "sts:AssumeRole"
    }
  ]
}
This role also needs a permissions policy granting the required S3 actions (e.g.,s3:GetObject,s3:PutObject,s3:ListBucket) on the target bucket or AmazonS3FullAccess for simplicity in a non-production setup.
With the bucket access granted and the role created, go to Manage Quick → AWS actions → New action, select Amazon S3, review the available operations (such asPutObject,GetObject,ListObjectsV2), and enter the connection details such as name, description, and the Role ARN created above. In the next step, share the connector with the relevant users or groups, granting Owner access to whoever needs to add it to an automation.

Amazon S3 Action Connector
Once created, the connector needs to be added to the relevant Automation Group's Assets before it becomes available inside an automation's action picker.
Since Amazon QuickSight’s manifest-based Amazon S3 datasets don't support XLSX, the automation exports the log in CSV format. A manifest file, pointing to the CSV's exact Amazon S3 location, is uploaded alongside it. This is what Amazon Quick reads when creating the dataset:
{
  "fileLocations": [
    {
      "URIs": [
        "https://<bucket-name>.s3.<region-name>.amazonaws.com/<file-name>.csv"
      ]
    }
  ],
  "globalUploadSettings": {
    "format": "CSV"
  }
}
To set this up:
Copy the JSON above into a plain text file and save it as manifest.json.In Amazon Quick, Data tab, create a new data source and select Amazon S3 as the type.
When prompted, upload the manifest.json file to complete the data source setup.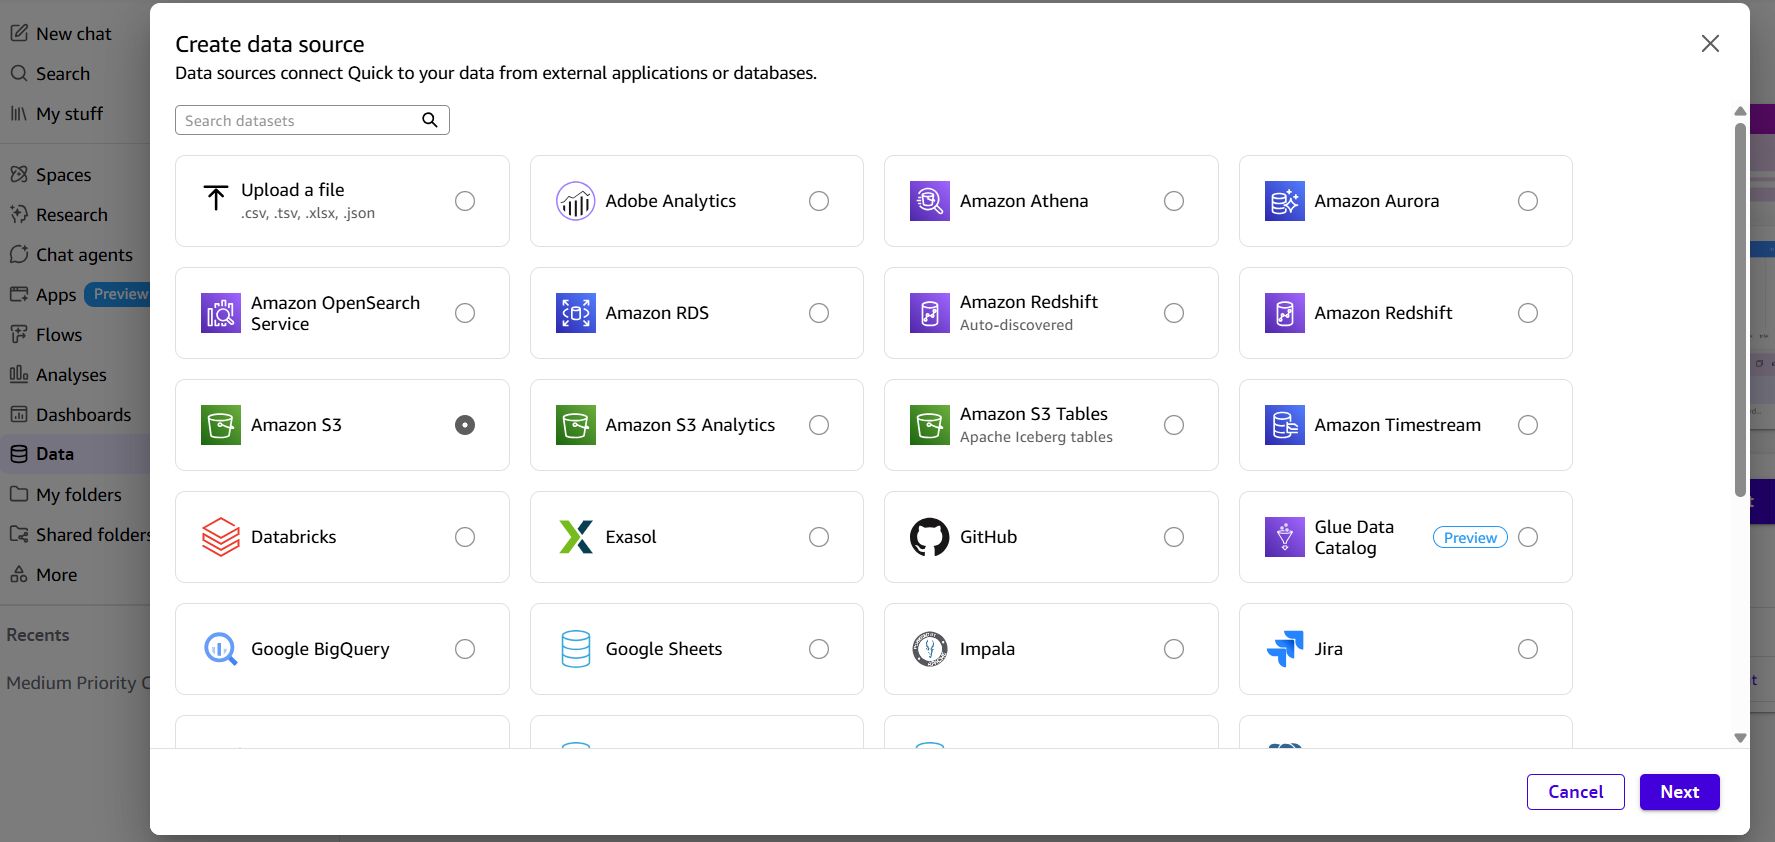
Creating a New Data Source in Amazon Quick
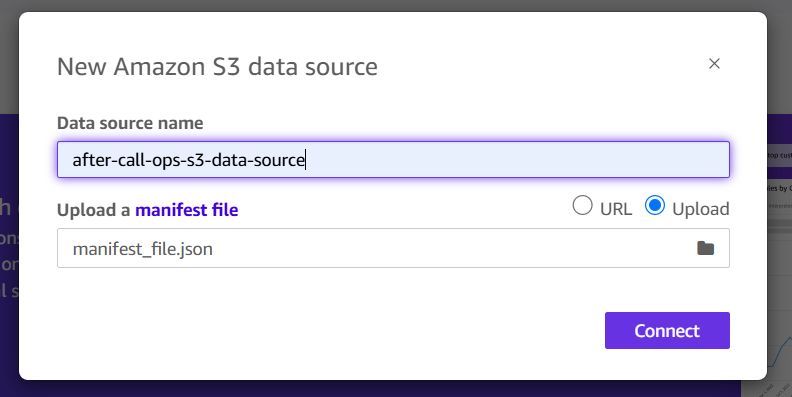
S3 Data Source Configuration with Manifest File
The dataset itself uses SPICE, Amazon Quick's in-memory engine, which means it doesn't update automatically just because the underlying CSV changes. It needs to be refreshed explicitly. This refresh can be triggered manually or set on a schedule (hourly, daily, weekly, or monthly), so the dashboard stays current without manual intervention.
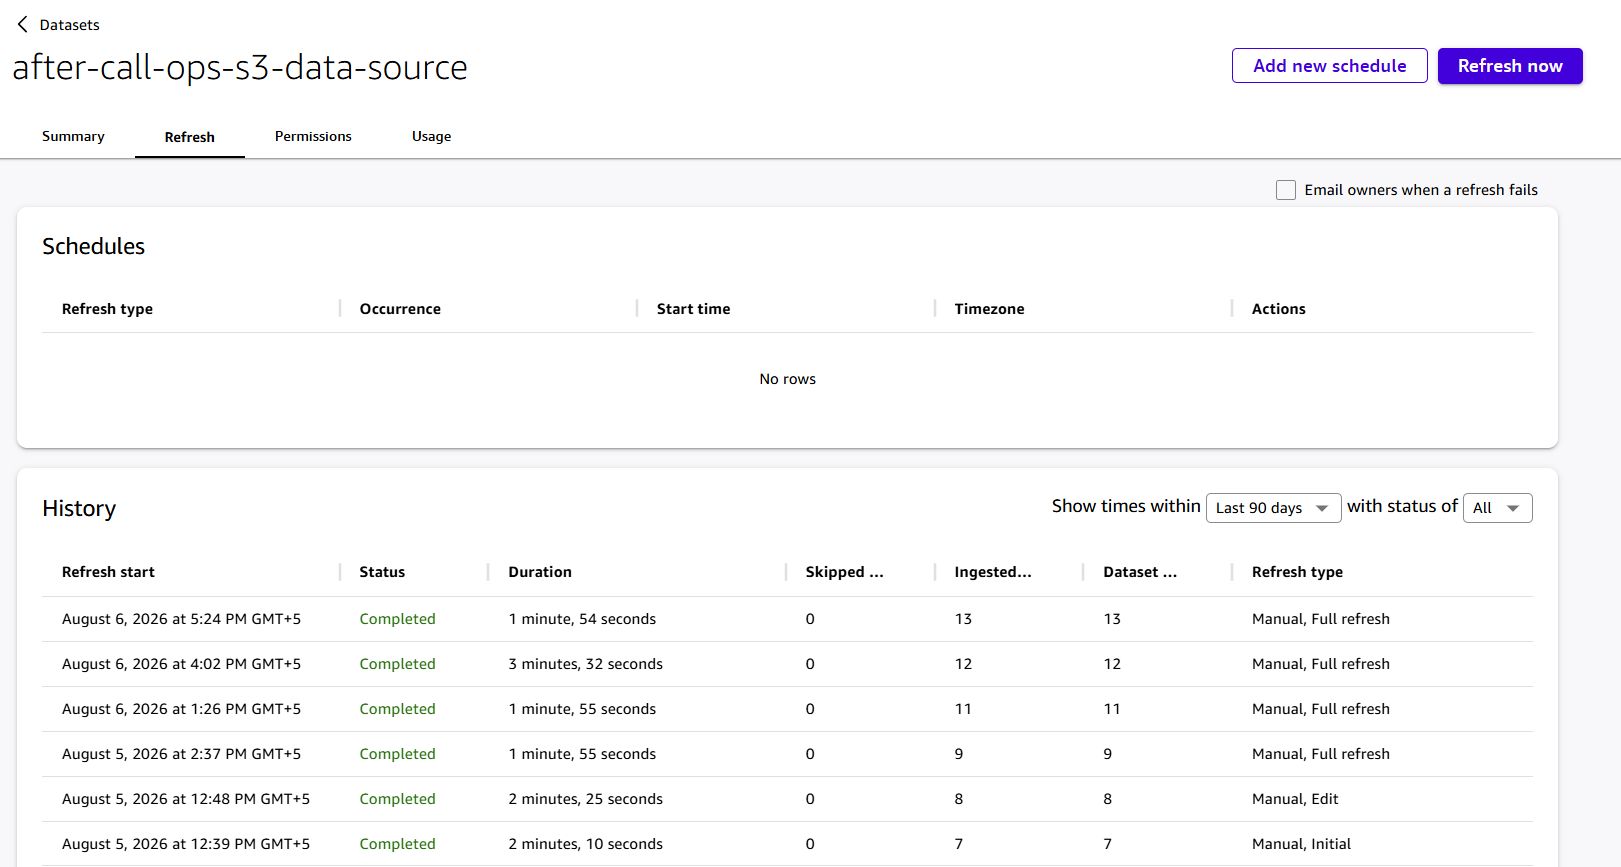
Dataset Refresh History
From this dataset, a Team Dashboard was built showing total cases processed, average QA score, QA score trend over time, and case volume by priority, giving supervisors a live view of quality and volume across the team.
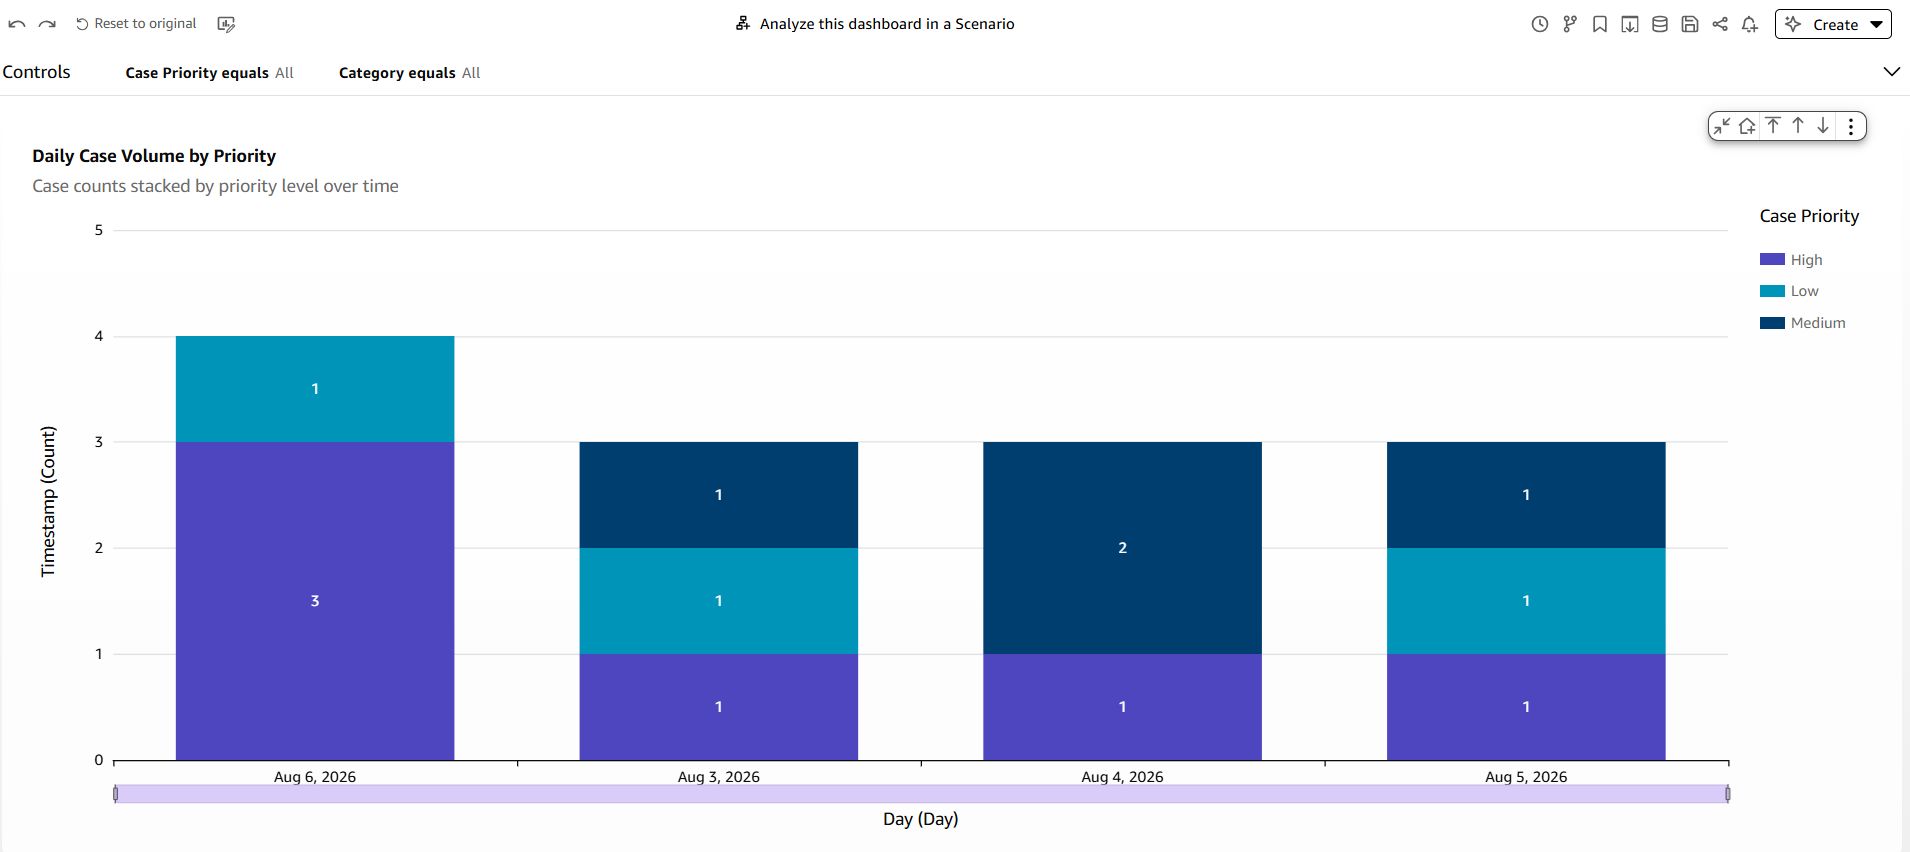
Daily Case Volume by Priority Dashboard
A Chat option is also available directly on this dataset, which lets supervisors ask direct questions in natural language, like how many cases came in at a given priority level instead of reviewing every case individually.
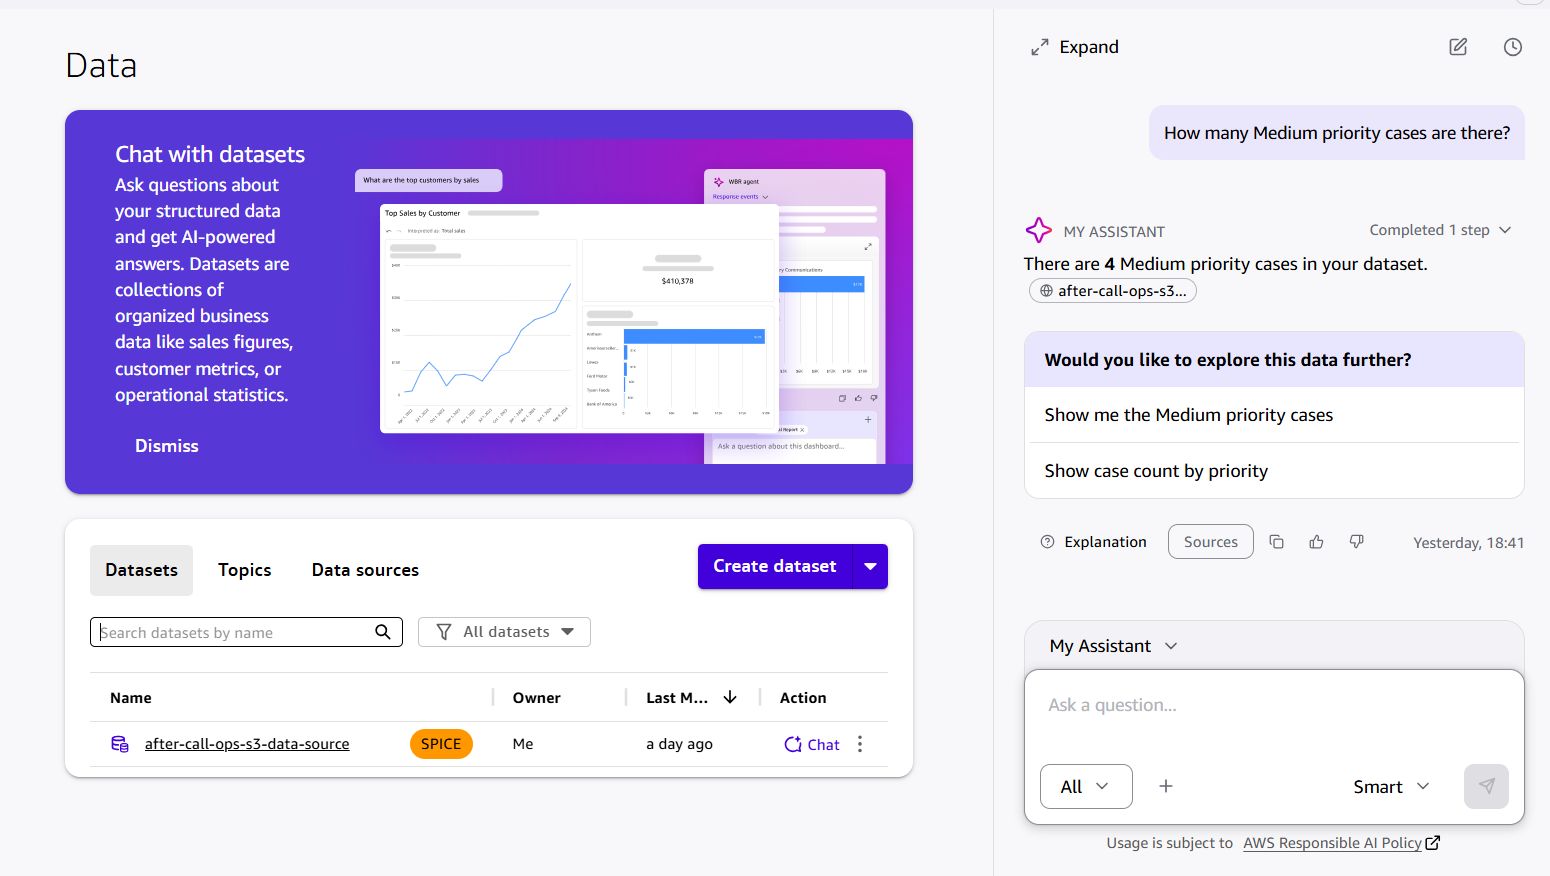
Chat with Dataset: Natural Language Query Example
This solution turns a finished call voice or text into a fully documented, quality-checked case without manual effort from the agent. It brings consistent Compliance scoring, richer Empathy evaluation for voice calls, and a live, always-current view of team quality and volume, giving contact centers faster resolution, consistent documentation, and QA coverage on every call.