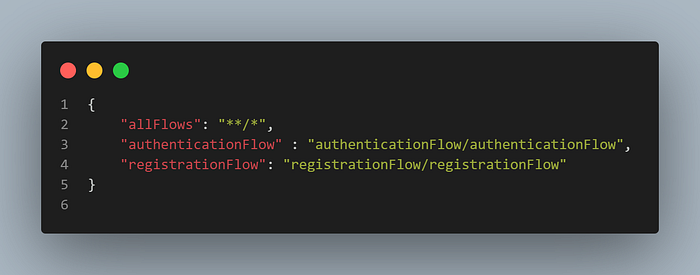
flowPath.json


Feb 20, 2024
4 min read
Cypress is an automation framework that supports browser interaction. Cucumber is a Gherkin-based test case management tool that can be used with automation frameworks such as Cypress. It helps in writing test cases that make sense to all the stakeholders ( technical and non-technical). For reporting, Mochawesome is quite a hot and famous reporter for Cypress. For soft assertions, a plugin can be installed as Cypress only supports hard assertions i.e. should/expect (Chai Assertions).
Now I will guide you regarding the steps to integrate Cucumber with Cypress.
You need to install the following dependencies first using npm/yarn:
Cypress
@badeball/cypress-cucumber-preprocessor
@bahmutov/cypress-esbuild-preprocessor
cypress-mochawesome-reporter
soft-assert
Chai assertions (already gets installed with Cypress)
cypress-dotenv
cypress-cucumber-attach-screenshots-to-failed-steps
In Cypress v12, a file named, cypress. config.js is automatically created in the root directory of the project. This file is mainly used for the configuration of plugins.
To configure cucumber you need to add these lines of code in the configuration file.
const { defineConfig } = require('cypress');
// import esbuild plugin
const {
  createEsbuildPlugin,
} = require('./node_modules/@badeball/cypress-cucumber-preprocessor/
dist/subpath-entrypoints/esbuild');
// import cucumber plugin
const {
  addCucumberPreprocessorPlugin,
} = require('@badeball/cypress-cucumber-preprocessor');
// Create Bundler
const createBundler = require('@bahmutov/cypress-esbuild-preprocessor');

module.exports = defineConfig({
  chromeWebSecurity: false,
  experimentalWebKitSupport: true,
  screenshotsFolder: 'cypress/screenshots',
  videosFolder: 'cypress/reports/videos',
  video: true,
  viewportWidth: 1280, // depend upon your requirement
  viewportHeight: 1000, // depend upon your requirement
  defaultCommandTimeout: 90000,
  execTimeout: 90000,
  pageLoadTimeout: 90000,
  taskTimeout: 90000,
  e2e: {
    specPattern: `cypress/integration/e2e/features/**/*.feature`,
    setupNodeEvents(on, config) {
      // add cucumber preprocessor in the events
      addCucumberPreprocessorPlugin(on, config);
      on(
        'file:preprocessor',
        createBundler({
          plugins: [createEsbuildPlugin(config)],
        })
      );
    },
  },
});
In the above snippet, only the feature file path is defined, the step definitions path needs to be defined as well. For this, add the following lines of code in “package.json”:
"cypress-cucumber-preprocessor": {
    "nonGlobalStepDefinitions": false,
    "stepDefinitions": [
      "cypress/integration/e2e/stepDefinitions/[filepath]/**/*.steps.js",
      "cypress/integration/e2e/stepDefinitions/**"
    ]
  }
In the “stepDefinitions” array two paths are defined:
The first one is required for single-file execution
The second one is required for all file execution
After that, step names can be imported into the step file like this
const {
  Given,
  When,
  Then
} = require(`@badeball/cypress-cucumber-preprocessor`);
Reporting organizes the results of your test execution which makes it easier for a tester to view or debug errors(in case of failures). That’s why requirements must be discussed with the team before configuring the reporter. Cypress Mochawesome Reporter is taken as an example for this blog.
The reporter options are configured in “cypress.config.js”. These lines of code will help you configure the reporter.
const { defineConfig } = require('cypress');

module.exports = defineConfig({
  reporter: 'cypress-mochawesome-reporter',
  reporterOptions: {
     reportDir: 'cypress/reports',
     charts: true,
     html: true,
     json: false,
     embeddedScreenshots: true,
     inlineAssets: true,
  },
  e2e: {
    setupNodeEvents(on, config) {
       // Use the reporter plugin here
       require('cypress-mochawesome-reporter/plugin')(on);
    },
  },
});
Then register the reporter in support/commands.js using the following syntax:
require('cypress-mochawesome-reporter/register');
Execution of the test suite is critical as we want to keep our command as dynamic, easy to use, and short as we can. For this, you can set up a JSON file to store the file path against a keyword to make the command compact and easy to handle.
For example, create a “flowPath.json” file in the fixture folder of Cypress.
flowPath.json
This file can act as a source map for the dynamic execution of flows. These lines of code need to be added in “cypress.config.json”.
const { defineConfig } = require('cypress');
// Environment Plugin to be imported
const dotenvPlugin = require('cypress-dotenv');
// Created Flow path json file to be imported
const flowPaths = require('./cypress/fixtures/flowPaths.json');

module.exports = defineConfig({
  e2e: {
    setupNodeEvents(on, config) {
       // You need to paste these lines of code
       // in already configured cypress.config.json
       config.specPattern = `cypress/integration/e2e/features/${
        flowPaths[config.env.flowName]
       }.feature`;
       config = dotenvPlugin(config);
       return config;
    },
  },
});
We have used an environment variable, “flowName”, in the configuration file to provide the feature or spec file name. To read an environment variable in the configuration file a plugin is used, “dotenvPlugin”.
Environment variables are easy to use in the step files compared to the configuration file. Test cases need to be executed across different test environments such as QA, UAT, or Prod. We can use environment variables inside the step file to hit that particular URL. For example,
let testEnv = Cypress.env('testEnv');
In the next section, you will learn to execute commands involving environment variables.
To execute your suite you can use the following commands:
1. Single File Execution
npx cypress run --env testEnv=UAT,flowName=authenticationFlow
2. All Files Execution
npx cypress run --env testEnv=PROD,flowName=allFlows
Note: The flow name environment variable value is set based on the key value pair used in “flowPaths.json”. For “testEnv” you can set up another JSON file as per your requirement.
The advantage of the above cucumber plugin is that you can use data tables in it easily. DataTables not only optimize the code coverage but also reduce the execution time of the scenario by a few seconds. These steps can help you configure Cypress with Cucumber easily. In case of any queries LinkedIn or Instagram.