Keycloak stands as a prevalent Identity and Access Management (IAM) tool, frequently embraced by customers for its open-source nature and robust functionalities. It has evolved into an industry standard for clients preferring self-hosted IAM solutions over SaaS alternatives like Okta or Azure AD for their Single Sign-On (SSO) necessities.
Being a seasoned Kubernetes practitioner, what if we simply adjust the Keycloak deployment to have 2 or more replicas to achieve HA? Shouldn’t it be pretty straightforward? — Umm .. Well, the answer is NO!
Problem with Just Increasing the replicas?
Out of the box, Keycloak isn’t configured to be deployed with multiple replicas in any environment, let alone in a Kubernetes cluster. By default, Keycloak assumes it’s a Standalone Instance without any knowledge of other Keycloak instances that may be running around it.
It uses a backend database that stores user information and data about your organization, and you set Keycloak to pull from it. If an instance of Keycloak (pod) goes down, Kubernetes spins a new one up and it retrieves the information from the database as normal and keeps on going.
While most data is stored in your backend database, there are a couple of pieces of important data that are stored in an internal Infinispan Cache inside each pod, like ***user authentication sessions. With our load balancer in front, if a user that was already authenticated was somehow directed to the other Keycloak pod, that pod would have no authentication data for them and force them to log in again.***
Infinispan is an open-source in-memory data grid that offers flexible deployment options and robust capabilities for storing, managing, and processing data. It provides a key/value data store that can hold all types of data, from Java objects to plain text, and also distributes your data across elastically scalable clusters to guarantee high availability and fault tolerance, whether you use Infinispan as a volatile cache or a persistent data store.
Setting up Keycloak High Availability
Multi-site deployments
Keycloak supports deployment that consists of multiple Keycloak instances that connect to forma Standalone Cluster *(multi-site deployment)*, using its embedded Infinispan Cache; loadbalancer can distribute the load evenly across those instances. Those setups are intended for a transparent network on a single site, but it entails an additional effort in tailoring deployments to achieve HA.
Deployment, Data storage, and Caching
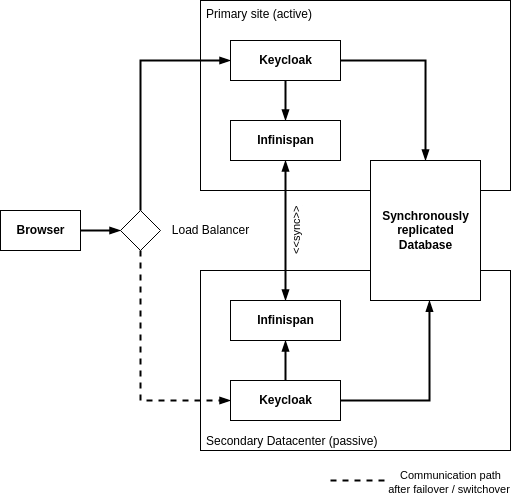
Two independent Keycloak instances running on different sites are connected with a low-latency network connection. Users, realms, clients, offline sessions, and other entities are stored in a database that is replicated synchronously across the two sites. The data is also cached in the Keycloak embedded Infinispan as local caches. When the data is changed in one Keycloak instance, that data is updated in the database, and an invalidation message is sent to the other site using the replicated work cache.
Architecture Diagram
Essentially, this setup allows multiple Keycloak instances to be made aware of each other so that the Infinispan Cache can be retrieved and shared by multiple instances of Keycloak. It has multiple ways of doing this:
Keycloak Clustering is based on the discovery protocols of JGroups (Keycloak uses Infinispan cache and Infinispan uses JGroups to discover nodes).
On the Kubernetes cluster, we are going to use KUBE\_PING as JGroups discovery protocol. These will discover how many containers are running in that namespace. It will get pod details using JGroups properties and it will sync up with each pod and also cache between one container to another using Infinispan concepts.
Steps to Make Keycloak HA
The following steps allow us to make a Keycloak run in HA mode:
Running Keycloak in Standalone clustered mode[Multi-site deployment]
Multiple replicas of deployment — to Tolerate pod(s) failure.
Scheduling of pods on different K8S Nodes
Enabling Readiness & Liveness probes
Implementation
1. Set up Keycloak with 2 replicas.
apiVersion: apps/v1
kind: Deployment
metadata:
  name: keycloak
  namespace: dev
  labels:
    app: keycloak
spec:
  replicas: 2
2. Set up podAntiAffinity to enforce the scheduling of pods to run on different nodes.
apiVersion: apps/v1
kind: Deployment
metadata:
  name: keycloak
spec:
  replicas: 2
  ... // additional configs truncated
  spec:
    podAntiAffinity:
        preferredDuringSchedulingIgnoredDuringExecution:
        - weight: 100
          podAffinityTerm:
            labelSelector:
              matchExpressions:
              - key: app
                operator: In
                values:
                - keycloak
            topologyKey: kubernetes.io/hostname
3. Optionally, add nodeAffinity to schedule the pods on dedicated nodes.
apiVersion: apps/v1
kind: Deployment
metadata:
  name: keycloak
spec:
  replicas: 2
  ... // additional configs truncated
  spec:
    affinity:
      nodeAffinity:
        requiredDuringSchedulingIgnoredDuringExecution:
          nodeSelectorTerms:
            - matchExpressions:
                - key: dedicated
                  operator: In
                  values:
                    - keycloak
4. Set the following environment variables in the Keycloak pod to run in Standalone Clustered Mode.
apiVersion: apps/v1
kind: Deployment
metadata:
  name: keycloak
spec:
  replicas: 2
  ... // additional configs truncated
  spec:
    containers:
      - name: keycloak
        image: quay.io/keycloak/keycloak:15.0.2
        ... // additional configs truncated
        env:
          - name: JGROUPS_DISCOVERY_PROTOCOL
            value: "kubernetes.KUBE_PING"
          - name: JGROUPS_DISCOVERY_PROPERTIES
            value: "dump_requests=false,namespace=dev"
          - name: CACHE_OWNERS_COUNT
            value: "2"
          - name: CACHE_OWNERS_AUTH_SESSIONS_COUNT
            value: "2"
          - name: KEYCLOAK_HTTP_PORT
            value: "80"
          - name: KEYCLOAK_HTTPS_PORT
            value: "443"
5. Enable Readiness & Liveness probes
apiVersion: apps/v1
kind: Deployment
metadata:
  name: keycloak
spec:
  replicas: 2
  ... // additional configs truncated
  spec:
    containers:
      - name: keycloak
        image: quay.io/keycloak/keycloak:15.0.2
        ... // additional configs truncated
        readinessProbe:
          httpPath: "/auth/realms/master"
          port: http
          initialDelaySeconds: 40
          periodSeconds: 10
          timeoutSeconds: 10
          failureThreshold: 3
        livenessProbe:
          httpPath: "/auth/"
          port: http
          initialDelaySeconds: 40
          periodSeconds: 10
          timeoutSeconds: 10
          failureThreshold: 5
After making the changes in deployment, let’s apply it to the k8s cluster.
kubectl apply -f keycloak-deployment.yaml
You should see the pods running in the mentioned namespace, as follows:
Verification of Keycloak HA
Here are the checks required to verify Keycloak is running in HA:
1. Pods running on different nodes
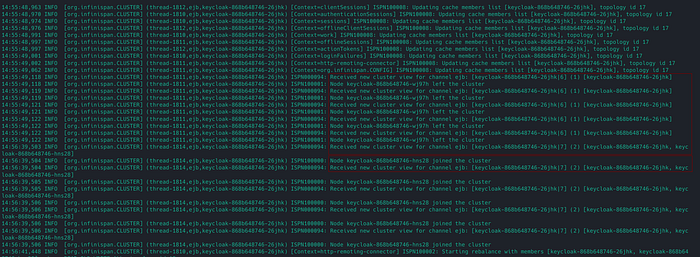
2. [Important] Look for the following lines in the pod’s logs to verify that Keycloak replicas are aware of each other while forming a CLUSTER.
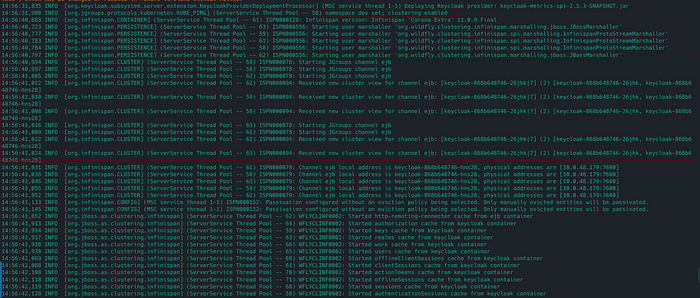
3. [Important] Check the pod’s log to verify that Keycloak is running Standalone-Clustered Mode.
4. The new Keycloak node can join/leave the Keycloak cluster.
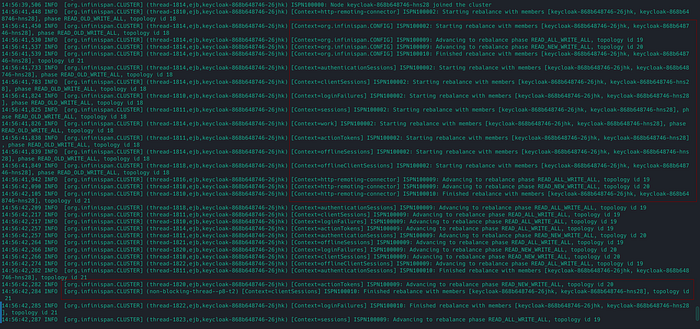
5. There is rebalancing happening between Keycloak pods
6. If the Keycloak primary instance goes down, It can fail over to the other instance, and vice versa.
7. Access the Keycloak UI, and make a session by logging into the account. Try restarting one of the Keycloak pods, and make sure the user session is still Valid.
— — — — — — — — — — — — — — — — — — — — — — — — — — — — — — — —
That’s all! You’ve made it to the end 🎉… I’d love to hear your thoughts on this solution. Don’t hesitate to ask questions or share suggestions about the post.
Happy learning! 😊
References