

Managing AWS Services Quotas
When you hear “Cloud,” you might picture a world of unlimited resources, a digital playground where the sky’s the limit. And while that’s not entirely wrong, there are some boundaries to be aware of — specifically, the service quotas and restraints set by Amazon Web Services (AWS).
You might wonder, “If I’m paying for cloud services, shouldn’t I be able to use as much as I want?” It’s a fair question! But these quotas and restraints protect you, preventing unexpected costs from spiraling out of control. The good news? Most of these service limits can be increased with a simple request to AWS.
What are Service Quotas?
In AWS, service quotas are limits defining the maximum amount of resources, actions, or items you can use within your account. These quotas apply to many services you might use daily, but you typically will only notice them if you reach a limit.
Here are a few examples of common service quotas in every AWS account:
5 VPCs (Virtual Private Clouds) per region: The maximum number of VPCs you can create in a single region.
100 Amazon S3 (Simple Storage Service) general-purpose buckets: The total number of Amazon S3 buckets allowed in your account.
500 On-Demand Amazon EC2 (Elastcic Compute Cloud) instances: The cap on the number of On-Demand Amazon EC2 instances you can run simultaneously.
To explore more about service quotas or manage them, visit the AWS Service Quotas Dashboard from your AWS Console.
Problem with Quotas
Many times, customers come to me with a familiar problem: there’s no cost-effective way to monitor service quotas. They often only discover these limits right when they’re about to go into production. This usually causes a brief moment of panic among developers, followed by a frantic Google search — only to realize that the issue could have been easily avoided.
But this isn’t just a technical hurdle; it impacts the business as well. Imagine you’re racing against a competitor to launch a new feature, only to be held back at the last minute by AWS service constraints you weren’t aware of. It’s frustrating, and worse — it’s avoidable with the right planning.
Where there’s a Problem, there’s a Solution
As a DevOps engineer, I fully understand the importance of observability — and I emphasize this to all my customers. Fortunately, AWS offers a pre-built solution that helps monitor and manage service quotas: Quota Monitor for AWS.
This solution is designed to give organizations a clear view of their service limits and constraints. It’s an excellent tool if you’re operating across multiple cloud environments, making it ideal for larger organizations with complex infrastructure.
However, a word of caution — Quota Monitor for AWS is a costly solution, and I wouldn’t recommend it for small to medium-sized businesses due to its high price tag. It’s best suited for enterprises with substantial cloud needs.
Building your own solution is CHEAPER!
The true power of AWS lies in its vast array of offerings, enabling users to create tailored solutions for virtually any challenge. All it takes is a little vision.
In this guide, I’ll walk you through building a cost-effective solution for monitoring your AWS service quotas — without breaking the bank.
Here’s what we’ll use:
Amazon Lambda: A serverless compute service that lets us run code in response to events, charging only for the compute time and resources used.
AWS SDK: Developer tools that allow us to interact with our AWS cloud environment programmatically.
Amazon Simple Notification Service (SNS): A messaging service to send alerts and notifications to your team.
A Cost-Effective Solution
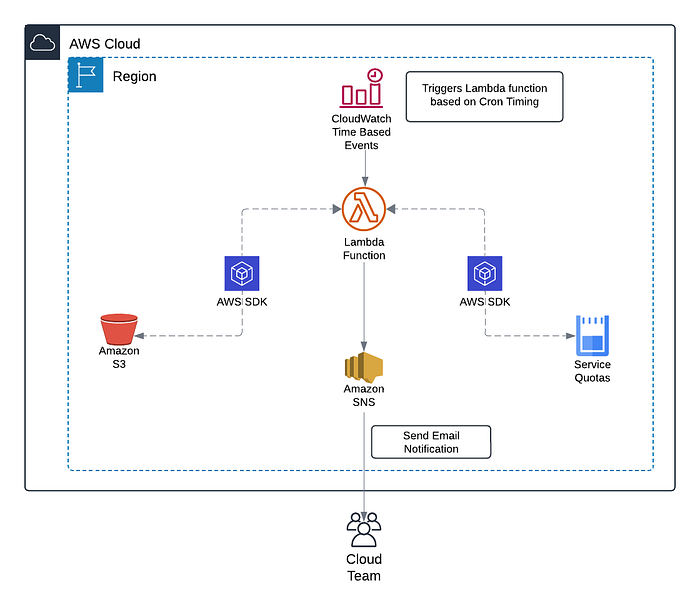
Reference architecture for custom solution to monitor AWS Quotas
For this example, we’ll focus on monitoring Amazon S3 bucket quotas. By default, AWS limits you to 100 Amazon S3 general-purpose buckets per account. In a scenario where your business frequently creates and deletes buckets, it’s crucial to monitor this quota to avoid hitting the limit unexpectedly. With the right setup, you’ll be alerted well in advance, preventing any surprise production downtime.
Step 1: Identify Services
With over 100+ AWS services, it offers more than you’ll likely need. Most users only work with 20–30 of these services, so there’s no point in monitoring quotas for services you aren’t using. The first step is to identify the critical services to your infrastructure that fall under AWS Service Quotas.
[In our case, it’s S3 Buckets*.]*
Step 2: Extract Information
Next, we need two important pieces of information: the Service Code and the Quota Code. These are unique identifiers used across AWS, but each service and quota has its specific code. You can find these codes on the AWS Service Quota Console.
In my case, I needed the service code for S3 and the quota code for General Purpose Buckets.
Go to AWS Service Quota Console
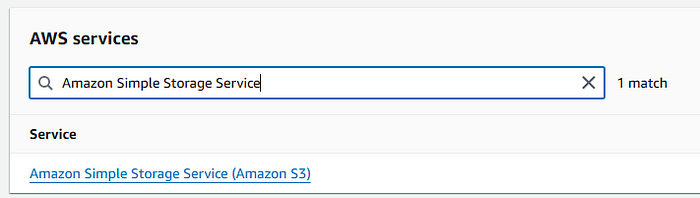
Navigate to AWS Services
Search for the Service e.g S3
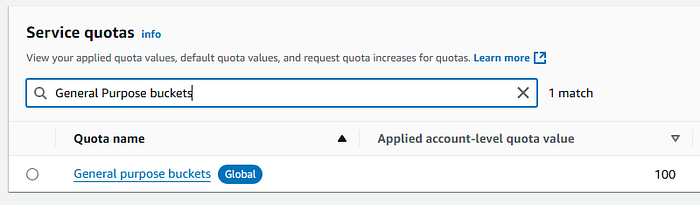
Search for quota e.g General purpose buckets
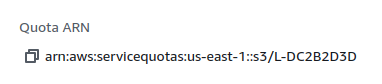
On the details panel, you will see the Quota Code.
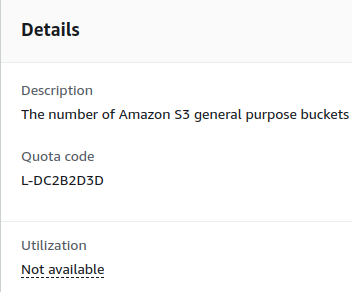
On the same panel, you will see the Quota ARN — the Service Code is between the region and quota code in the ARN.
[In our case, it’s ‘s3’]
Step 3: Deploy Solution
Step 3.1: Create Lambda Function
Next, we’ll create a Lambda function, which will handle the core computation in our solution. This function will check both the set quota and current usage of your AWS resources, all through the AWS SDK.
The AWS SDK is a developer tool maintained by AWS, available in all major programming languages, so you can choose whichever language you’re most comfortable with. In this guide, we’ll be using the JavaScript SDK, but feel free to use any other language that suits your needs.
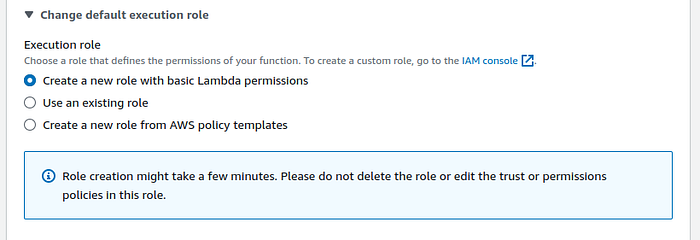
First, create a new Lambda function. When selecting the runtime, choose the one that matches your preferred programming language. Since I’m using JavaScript, I’ll proceed with Node.js.

When it comes to the execution role, I recommend letting Lambda create its default role for now. We’ll add the necessary permission policies to this role later.
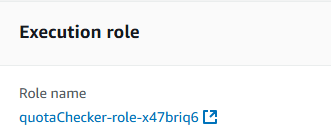
Step 3.2: Attach IAM Policies
Next, we need to assign the correct permissions to our Lambda function. Lambda requires specific IAM Policies to interact with AWS services, which we’ll add to the default execution role. To locate the role Lambda created, go to Configuration → Permissions.
Add the following policies to your Lambda role:
Permissions for publishing to an Amazon SNS Topic
Permissions to list Amazon S3 buckets
Permissions to list service quotas
// Policy for publishing to SNS Topic
{
    "Version": "2012-10-17",
    "Statement": [
        {
            "Sid": "VisualEditor0",
            "Effect": "Allow",
            "Action": "sns:Publish",
            "Resource": "*"
        }
    ]
}
// Policy for S3 Buckets
{
    "Version": "2012-10-17",
    "Statement": [
        {
            "Sid": "VisualEditor0",
            "Effect": "Allow",
            "Action": "s3:ListAllMyBuckets",
            "Resource": "*"
        }
    ]
}
// Policy for Service Quotas
{
    "Version": "2012-10-17",
    "Statement": [
        {
            "Sid": "VisualEditor0",
            "Effect": "Allow",
            "Action": "servicequotas:ListServiceQuotas",
            "Resource": "*"
        }
    ]
}
Step 3.3: Add layers
Next, we will add layers to fulfill the dependencies of NodeJS applications. To learn more about layers check out, AWS’ Documentation on Lambda Layers.
[If your language does not require you to add dependencies you can skip this step.]
To learn how to manage dependencies using Lambda layers check out, AWS’ Documentation on Adding Layers to Functions.
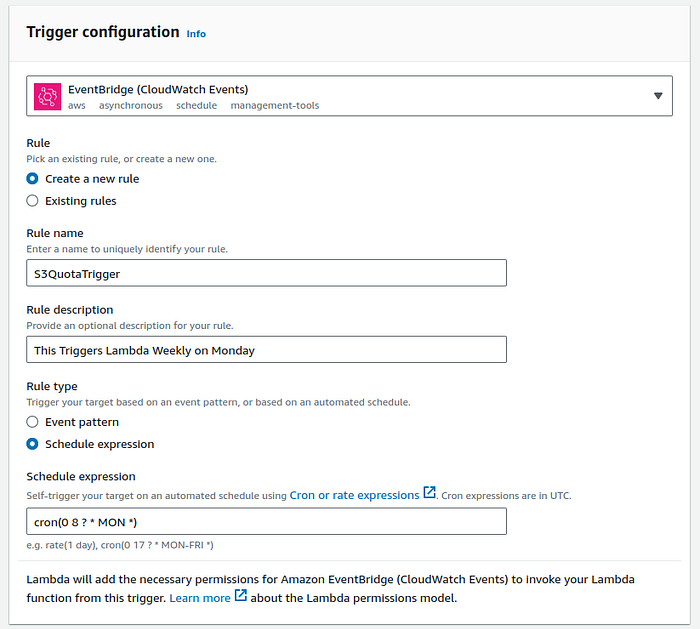
Step 3.4: Adding trigger
Now to trigger this lambda on a regular interval we will set Lambda Trigger to the Event Bridge Cron Job.
Go to Configuration → Triggers → Add Trigger
We set the Rule type to Schedule Expression and Add Cron Expression. I have set it to trigger every Monday but you can change it accordingly. To learn more about Cron Expression please check out AWS’ Documentation on Cron Expressions.
[You can change the cron expression depending on how frequently you want the Lambda to trigger.]
Step 3.5: Add Code to Lambda
Now we will add our code to the lambda function.
const { ServiceQuotasClient, ListServiceQuotasCommand } = require("@aws-sdk/client-service-quotas");
const { S3Client, ListBucketsCommand } = require("@aws-sdk/client-s3");
const { SNSClient, PublishCommand } = require("@aws-sdk/client-sns");

const s3Client = new S3Client();
const serviceQuotaClient = new ServiceQuotasClient();
const snsClient = new SNSClient();

const s3Input = {};

// Create Input to send to Service Quota API
const serviceQuotaInput = {
  ServiceCode: s3,
  QuotaCode: L-DC2B2D3D
};

// Create SNS Topic and feel free to customize your message and email.
const snsInput =  {
  TopicArn: [ARN OF YOUR SNS TOPIC],
  Message: "You are reaching the Default Quota for S3 Bucket Provisioned in your account"
};

exports.handler = async function(event, context){
  // Get Current List of Buckets in Account
  const s3Command = new ListBucketsCommand(s3Input);
  const s3Response = await s3Client.send(s3Command);
  let currents3Buckets = s3Response.Buckets.length;

  // Get Current Quota for Buckets in Account
  const serviceQuotaCommand = new ListServiceQuotasCommand(serviceQuotaInput);
  const serviceQuotaResponse = await serviceQuotaClient.send(serviceQuotaCommand);
  let totalBucket = serviceQuotaResponse.Quotas[0].Value;

  // Define what is acceptable for you
  let acceptableRange = 0.90;

  // Do some Calculations and publish a message to SNS
  if (currents3Buckets > totalBucket * acceptableRange) {
    const SNScommand = new PublishCommand(snsInput);
    const response = await snsClient.send(SNScommand);
  }

  // Just some logging for ourself
  console.log("Total Bucket Allow: " + totalBucket);
  console.log("Total Buckets Provisioned: " + currents3Buckets);

  return 200;
};
Don’t worry if this code seems a little bit overwhelming. Let’s go through it step by step to understand the logic.
Step 3.5.1: Import Statements
const { ServiceQuotasClient, ListServiceQuotasCommand } = require("@aws-sdk/client-service-quotas");
const { S3Client, ListBucketsCommand } = require("@aws-sdk/client-s3");
const { SNSClient, PublishCommand } = require("@aws-sdk/client-sns");
This JavaScript code imports specific AWS SDK clients and commands for working with AWS Service Quotas, S3 (Simple Storage Service), and SNS (Simple Notification Service).
Step 3.5.2: Client Connections
const s3Client = new S3Client();
const serviceQuotaClient = new ServiceQuotasClient();
const snsClient = new SNSClient();
This JavaScript code creates new client objects for AWS S3, Service Quotas, and SNS to interact with these AWS services.
Step 3.5.3: Configure Input Objects
const s3Input = {};

const serviceQuotaInput = {
  ServiceCode: s3,
  QuotaCode: L-DC2B2D3D
};

const snsInput =  {
  TopicArn: [ARN OF YOUR SNS TOPIC],
  Message: "You are reaching the Default Quota for S3 Bucket Provisioned in your account"
};
This Javascript code creates JSON objects that we pass as input.
In the input of Service Quota, we pass the Service Code and Quota Code we extracted earlier.
In the SNS input we will pass the ARN of the Topic that you will use to send notifications so make sure you replace this with the ARN of your Topic.
You can also customize the message you want to send — for more information about customization check AWS SDK Documentation of SNS.
Step 3.5.4: Lambda Handler Code
exports.handler = async function(event, context){
  // Get Current List of Buckets in Account
  const s3Command = new ListBucketsCommand(s3Input);
  const s3Response = await s3Client.send(s3Command);
  let currents3Buckets = s3Response.Buckets.length;

  // Get Current Quota for Buckets in Account
  const serviceQuotaCommand = new ListServiceQuotasCommand(serviceQuotaInput);
  const serviceQuotaResponse = await serviceQuotaClient.send(serviceQuotaCommand);
  let totalBucket = serviceQuotaResponse.Quotas[0].Value;

  let acceptableRange = 0.90;

  if (currents3Buckets > totalBucket * acceptableRange) {
    const SNScommand = new PublishCommand(snsInput);
    const response = await snsClient.send(SNScommand);
  }

  console.log("Total Bucket Allow: " + totalBucket);
  console.log("Total Buckets Provisioned: " + currents3Buckets);

  return 200;
};
Finally, the Lambda handler code.
We first use AWS SDK S3 Client ‘ListBucketsCommand’ to get all the buckets in our account. Next we use the JavaScript length function to calculate the total number of buckets. Remember, we are not interested in the buckets’ content and metadata but only the number of buckets.
Then we use AWS SDK Service Quota Client ‘ListServiceQuotasCommand’ to get the bucket quotas set in the account. We parse the result to get the quota number.
We then define the Threshold range (I have used 0.90 which is equivalent to 90% but you can change that according to your business needs).
[You can change the threshold range according to your business needs.]
Then we compare and if the buckets have reached the threshold value we send a message to the SNS Topic using AWS SDK SNS Client ‘PublishCommand’. Lastly, we log the results in case we want to check the logs in the future.
Congratulations!

With that, your quota monitor is now set up! You’ll start receiving notifications whenever your quotas approach their threshold, ensuring that service constraints never catch you off guard again.
Observability is a key pillar of the Reliability section in the AWS Well-Architected Framework. If you’ve successfully implemented this solution — congratulations! You’re now one step closer to having a well-architected infrastructure.