Microsoft Azure Active Directory
We all have heard of Active Directory, right? Well, for those of us who have not, Microsoft AD(Active Directory) is a framework that allows centralized management for authentication and authorization between resources, devices, and users in an on-premises environment.
With the rise of cloud computing Microsoft introduced Azure Active Directory, which is essentially the same thing but for the cloud. However, Microsoft revamped it to “Microsoft Entra ID”.
Why should you use Microsoft Entra ID?
Now, you could just go ahead and implement your own identity framework. However, that would not only be time-consuming and complex but also prone to security vulnerabilities if not implemented correctly. Instead, leveraging a robust identity and access management solution like Microsoft Entra ID can save considerable effort and ensure a high level of security and compliance.
Step-by-Step Guide to Integrating Microsoft Entra ID using Postman
For integrating Microsoft Azure AD (now Microsoft Entra ID) as an Identity Provider (IDP) in my application, I chose Postman over JMeter. While both tools are excellent for API testing, Postman offers a more user-friendly interface and robust features that simplify the process of testing and managing API calls. Here’s how I used Postman to add Microsoft Entra ID as an IDP in my application.
Step 1: Set Up Postman
First, ensure you have Postman installed. If not, download and install it from the official Postman website(https://www.postman.com/downloads/).
Step 2 : Generate Credentials for Application in Microsoft Entra ID
The following steps need to be completed in order to proceed;
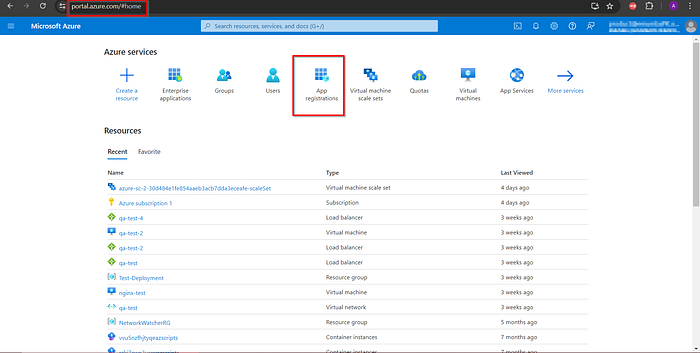
a. Navigate to the Microsoft Entra Admin Center and sign in with your admin account and go to “App Registrations”.
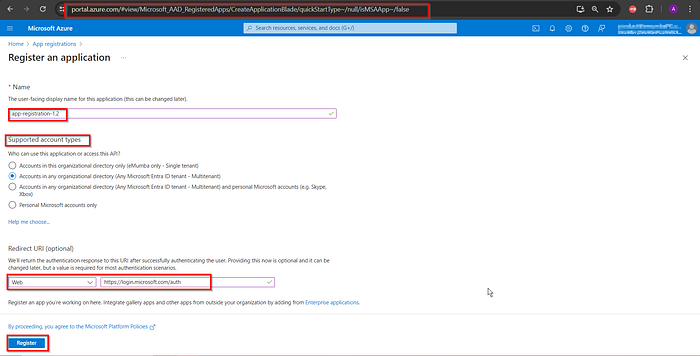
b. Now, create a new application, all you have to do is provide a name for your application, select the supported account types and enter the redirect URI (which is the URL to which authentication responses can be sent). Finally Click “Register” and voila you are done.
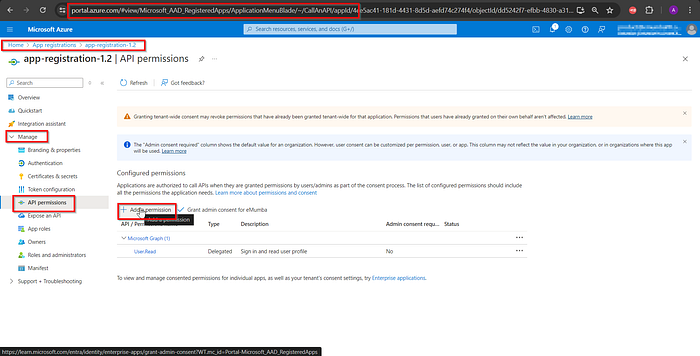
c. Configure Microsoft Graph API permissions as we need these to actually ensure that the admin has consent for required permissions as per your needs.
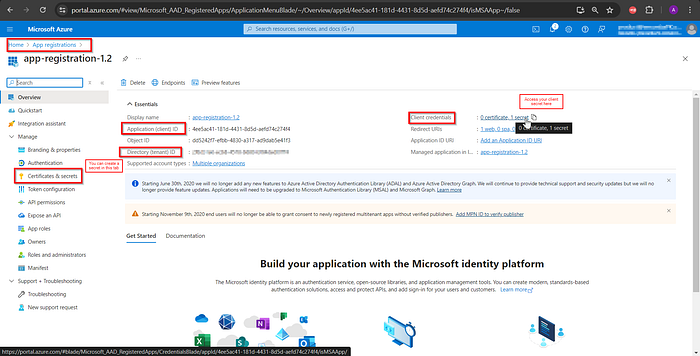
d. Generate client secrets and save them securely, as we need to access these later for authentication.
Step 3. Set Up Postman to Obtain an Access Token
a. Create a new collection in Postman:
Open Postman and create a new collection to organize your requests related to Microsoft Entra ID integration.
b. Add a new request to get the access token:
POST https://login.microsoftonline.com/{{tenant-id}}/oauth2/v2.0/token
Replace tenant-id with your own tenant-id that you generated in Step 2d. Add the following body to your request in x-www-form-urlencoded.
grant_type: client_credentials
client_id: {{application-client-id}}
client_secret: {{application-client-secret}}
scope: https://graph.microsoft.com/.default
c. Click “Send” to obtain the access token. If configured correctly, you should receive a JSON response containing the access token.
Step 4: Create an Enterprise Application in Microsoft Entra ID
POST https://graph.microsoft.com/v1.0/applications
For the body, you need to just add the following JSON object.
{
    "displayname":"My First Application"
}
Make sure you add the Authentication Header containing the Access token in your request.
Step 5: Obtain Credentials from your own application
To start provisioning users we need to get IDP credentials from our own application, this will be in the form of key-value pairs; a base-address and a secret token.
Step 6: Validate and Save your Credentials
With the base-address and secret token obtained from our own application, we need to authenticate the connection between our Application and Microsoft Entra ID. Your {job-id} would be “scim.{{tenant-id}}.{{application-id}}”. SCIM stands for System for Cross-domain Identity Management. It provides a standardized way to automate the exchange of user identity information across different domains or systems, such as between a corporate directory service and a cloud-based application. You can read more about SCIM at the official Microsoft website. https://www.microsoft.com/en-us/security/business/security-101/what-is-scimPOST https://graph.microsoft.com/v1.0/servicePrincipals/{{service-principal-id}}/synchronization/jobs/{{job-id}}/validateCredentials
The request body should contain the following JSON object.
{
  "credentials": [
    {
      "key": "BaseAddress",
      "value": "{{base-address}}"
    },
    {
      "key": "SecretToken",
      "value": "{{secret-token}}"
    }
  ]
}
Step 7: Start provisioning Job
POST https://graph.microsft.com/beta/servicePrincipals/{{service-principal-id}}/synchronization/jobs/{{job-id}}/start
You can sign in to your application and verify that users have been synced across the platforms.
Conclusion
Utilizing Microsoft Entra ID streamlines and secures the identity management integration process for our application. IT also ensures high-level security and compliance. The step-by-step approach using Postman facilitates easy handling of OAuth 2.0 authentication flows, token management, and API endpoint testing. This integration provides seamless access control for cloud-based applications, significantly simplifying the implementation of centralized identity and access management.